Developer Guide
PetCode Developer Guide
Welcome to the PetCode Developer guide!PetCode is a desktop app that helps store and manage contact information for your pet sales coordination business.

Table of Contents
- Acknowledgements
- Setting up, getting started
- Design
- Architecture
- Implementation
- Documentation, logging, testing, configuration, dev-ops
- Appendix: Requirements
- Appendix: Instructions for manual testing
- Appendix: Effort
Acknowledgements
- The features Add, Edit, Delete were reused with minimal changes from the past project Address Book Level 3 (UG, DG).
Setting up, getting started
Refer to the guide Setting up and getting started.
Design
.puml files used to create diagrams in this document can be found in
the diagrams folder. Refer to the PlantUML
Tutorial at se-edu/guides to learn how to create and edit
diagrams.
Architecture

The Architecture Diagram given above explains the high-level design of the App.
Given below is a quick overview of main components and how they interact with each other.
Main components of the architecture
Main has two classes
called Main
and MainApp. It
is responsible for,
- At app launch: Initializes the components in the correct sequence, and connects them up with each other.
- At shut down: Shuts down the components and invokes cleanup methods where necessary.
Commons represents a collection of classes used by multiple other components.
The rest of the App consists of four components.
-
UI: The UI of the App. -
Logic: The command executor. -
Model: Holds the data of the App in memory. -
Storage: Reads data from, and writes data to, the hard disk.
How the architecture components interact with each other
The Sequence Diagram below shows how the components interact with each other for the scenario where the user issues
the command delete-b 1.

Each of the four main components (also shown in the diagram above),
- defines its API in an
interfacewith the same name as the Component. - implements its functionality using a concrete
{Component Name}Managerclass (which follows the corresponding APIinterfacementioned in the previous point).
For example, the Logic component defines its API in the Logic.java interface and implements its functionality using
the LogicManager.java class which follows the Logic interface. Other components interact with a given component
through its interface rather than the concrete class (reason: to prevent outside component’s being coupled to the
implementation of a component), as illustrated in the (partial) class diagram below.

The sections below give more details of each component.
UI component
The API of this component is specified
in Ui.java
Given below is a partial class diagram of the Ui component.

The UI consists of a MainWindow that is made up of parts including CommandBox, ResultDisplay, StatusBarFooter.
The MainWindow also has HelpWindow and AddCommandPopupWindow that will be shown to the user when required.
Detailed implementation of the AddCommandPopupWindow is written here.
All these UI components, including the MainWindow, inherit from the abstract UiPart class which captures the commonalities between
classes that represent parts of the visible GUI.
Furthermore, the MainWindow can be filled by one list panel, such as BuyerListPanel or PetListPanel, for display.
The list panel displayed depends on the input Command.
Each list panel can have any number of the corresponding card. For example, BuyerListPanel can have any number
of BuyerCard.
All the list panels and cards inherit from the abstract UiPart, but not shown in the diagram below to reduce graph
complexity.
Detailed implementation of the list panel can be found here.
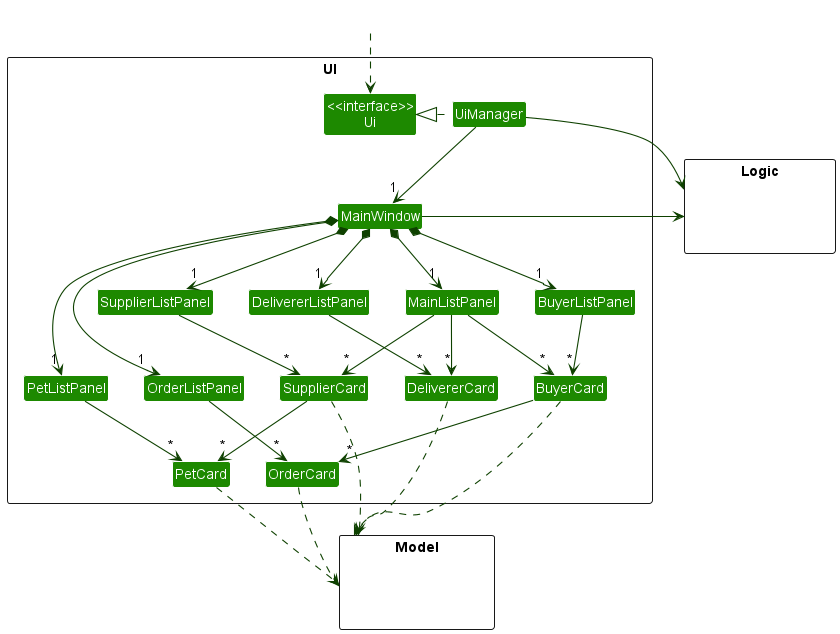
The UI component uses the JavaFx UI framework. The layout of these UI parts are defined in matching .fxml files that
are in the src/main/resources/view folder. For example, the layout of
the MainWindow
is specified
in MainWindow.fxml
The UI component,
- executes user commands using the
Logiccomponent. - listens for changes to
Modeldata so that the UI can be updated with the modified data. - keeps a reference to the
Logiccomponent, because theUIrelies on theLogicto execute commands. - depends on some classes in the
Modelcomponent, as it displaysPersonobjects residing in theModel.
Logic component
API : Logic.java
Here’s a (partial) class diagram of the Logic component:

How the Logic component works:
- When
Logicis called upon to execute a command, it uses theAddressBookParserclass to parse the user command. - This results in a
Commandobject (more precisely, an object of one of its subclasses e.g.,AddBuyerCommand) which is executed by theLogicManager. - The command can communicate with the
Modelwhen it is executed (e.g. to add a buyer). - The result of the command execution is encapsulated as a
CommandResultobject which is returned fromLogic.
The Sequence Diagram below illustrates the interactions within the Logic component for the execute("delete-b 1") API
call.

DeleteBuyerCommandParser should end at the destroy marker (X) but due to a limitation of PlantUML, the lifeline reaches the end of diagram.
Given below is a diagram showing some other classes in Logic (omitted from the class diagram above) that can be used for parsing a user command:

ArgumentMultiMap, ArgumentTokenizer and CliSyntax may not be used for some XYZCommandParser objects. Read the information section below for further explanation.
Some parsers can return different
Command objects.The
SortCommandParser returns one of SortCommand’s subclasses – SortBuyerCommand,
SortDelivererCommand, SortSupplierCommand, SortOrderCommand, and SortPetCommand.The implementation of
SortCommandParser was done such that the SortCommand is able to accept multiple inputs for the
LIST_TYPE and ATTRIBUTES parameters. Hence, the SortCommandParser makes use of SortCommandParserUtil
and CommandUtil classes which help to parse the multiple valid parameters and return the correct SortCommand
subclass.Given below is the Parser classes diagram for the
SortCommand.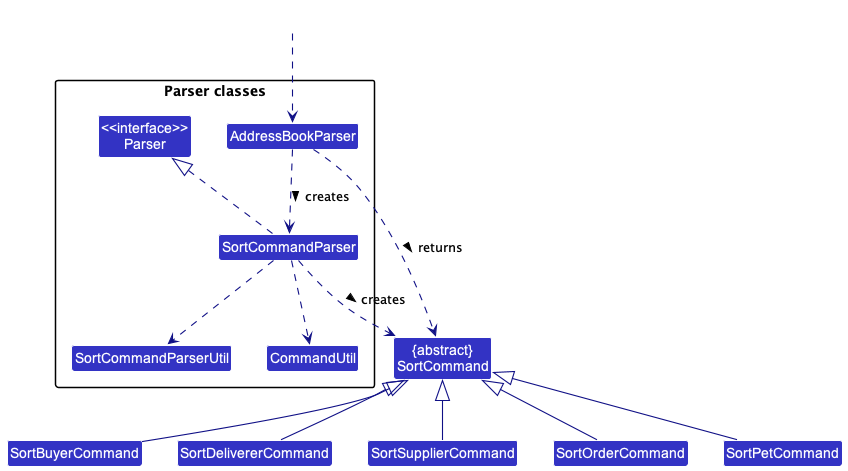
Some
Command objects are similar but have their own parsers and behave distinctly.The
AddressBookParser creates DeleteBuyerCommandParser, DeleteSupplierCommandParser,
DeleteDelivererCommandParser, DeleteOrderCommandParser, or a DeletePetCommandParser depending on the user’s input.
Each DeleteCommand parser then returns the respective DeleteCommand to AddressBookParser for execution,
i.e DeleteBuyerCommandParser parse method returns a DeleteBuyerCommand object.This way of implementation is done for commands that are very similar but have different
COMMAND_WORDs, such as the
AddCommand, DeleteCommand, EditCommand, FilterCommand, and FindCommand.Given below is the Parser classes diagram for the
DeleteCommand.
ParserUtil and Index classes are omitted from the diagram to reduce graph complexity.
How the parsing works:
- When called upon to parse a user command, the
AddressBookParserclass creates anXYZCommandParser(XYZis a placeholder for the specific command name e.g.,AddBuyerCommandParser) which uses the other classes shown above to parse the user command and create aXYZCommandobject (e.g.,AddBuyerCommand) which theAddressBookParserreturns back as aCommandobject. - All
XYZCommandParserclasses (e.g.,AddBuyerCommandParser,DeleteBuyerCommandParser, …) inherit from theParserinterface so that they can be treated similarly where possible e.g, during testing.
Model component
API : Model.java

The Model component,
- stores the address book data i.e., all
Buyer,Supplier,Deliverer,Order, andPetobjects (which are contained in aUniqueBuyerList,UniqueDelivererList,UniqueSupplierList,UniqueOrderList, andUniquePetListobject). - stores the currently ‘selected’
Buyer,Supplier,Deliverer,Order, andPetobjects (e.g., results of a search query) as a separate filtered list which is exposed to outsiders as an unmodifiableObservableList<Buyer>,ObservableList<Supplier>,ObservableList<Deliverer>,ObservableList<Order>,ObservableList<Pet>that can be ‘observed’ e.g. the UI can be bound to this list so that the UI automatically updates when the data in the list change. - stores a
UserPrefobject that represents the user’s preferences. This is exposed to the outside as aReadOnlyUserPrefobjects. - does not depend on any of the other three components (as the
Modelrepresents data entities of the domain, they should make sense on their own without depending on other components)
The diagrams given below contains more details on how each
Buyer, Supplier,
Deliverer, Order and Pet objects are stored in the Model component. For more information on what each object represents, refer to the Glossary section.
Buyer and Deliverer ClassBoth the
Buyer and Deliverer classes inherit from the Person class and have an orders attribute.
Each order has an UniqueId for easier identification. Hence, the orders are stored as a collection of UniqueId
objects to easily access unique orders. Given below is the class diagram for the Buyer Class: 
Supplier ClassSimilar to the
Buyer and Deliverer class, the Supplier class inherits from the Person class. However, instead of
an orders attribute, the Supplier class has a pets attribute to represent the pets sold by the Supplier.
Similar to an order, each pet has an UniqueId for easier identification. Hence, the pets are stored as a collection of
UniqueId objects to easily access unique pets. Given below is the class diagram for the Supplier Class: 
Order ClassThe
Order class consists of several attributes. The most important attribute to take note of is the Buyer as
every order should be made by a Buyer. Given below is the class diagram for the Order Class: 
Pet ClassThe
Pet class consists of several attributes. The most important attribute to take note of is the Supplier as
every pet should be sold by a Supplier. Given below is the class diagram for the Pet Class: 
Storage component
API : Storage.java

The Storage component,
- can save both address book data and user preference data in json format, and read them back into corresponding objects.
- inherits from both
AddressBookStorageandUserPrefStorage, which means it can be treated as either one (if only the functionality of only one is needed). - depends on some classes in the
Modelcomponent (because theStoragecomponent’s job is to save/retrieve objects that belong to theModel)
Common classes
Classes used by multiple components are in the seedu.addressbook.commons package.
Implementation
This section describes some noteworthy details on how certain features and functionalities are implemented.
Unique ID Mechanism
Motivation for unique ID
The Buyer object has a reference to Order object(s) and an Order object also has reference to a Buyer object.
Similarly, the Supplier object has a reference to Pet object(s) and vice versa.
This bidirectional association makes it difficult to implement some JSON-related classes and methods,
since the JSON-adapted models will recursively write these references into the .json file for infinite number of times.
Implementation of unique ID
Our solution to this problem is to give each Order and Pet a unique ID that does not change throughout the life
cycle of Order or Pet object.
We considered using a unique int or long data type to represent the id, but either int or long is possible to
have overflow (though very unlikely), resulting in duplicate IDs. Therefore, we thought of another approach, which is
strings.
We regard a string as a base 26 number ('a' - 'z'). Every time the least significant digit shifts from 'z'
to 'a', we do a carry to the more significant digit. Repeat this step until there is no more carry or the most
significant digit has a carry. In the latter case, we append another 'a' as the most significant digit. As shown below.

For efficiency, the ID generator is implemented by a List of char, which avoids frequent string copying and
concatenating. List facilitates fast in-place edit of a single char at a single index as well.
Display of person list
Motivation for display of person list
Given below is a partial class diagram of the old UI.
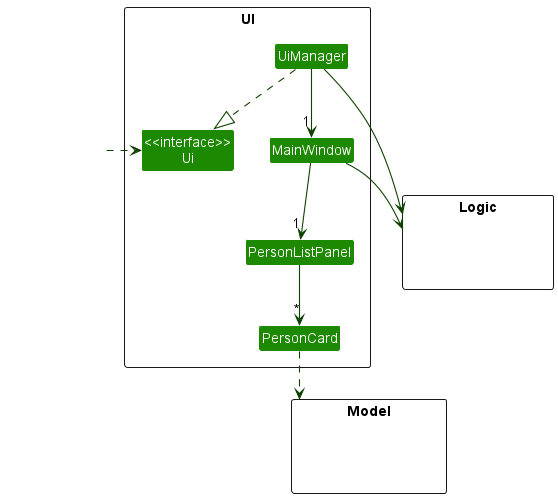
Initially, there is only one PersonListPanel that displays the person list using PersonCard.
However, our product classifies Person into three different categories – Buyer, Supplier, and Deliverer.
Therefore, it is necessary to have a separate list panel for each of these three types of Person.
In addition, buyers, suppliers and deliverers have comprehensive information on the orders or pets that they possess (not implemented for deliverers yet),
besides their contact information.
A PersonCard with only Label of JavaFX will display information in a very unorganised and lengthy way, which is
difficult for users to obtain information quickly.
Therefore, the UI needs to be optimised for the situation where there is plentiful information that the user wants
to know about a single Person.
Implementation of display of person list
In the implementation as seen in the diagram below, the MainWindow can be filled by any one of the following
depending on the Command executed:
-
BuyerListPanel: displays information about eachBuyerusing aBuyerCardin aListView. -
SupplierListPanel: displays information about eachSupplierusing aSupplierCardin aListView. -
DelivererListPanel: displays information about eachDelivererusing aDelivererCardin aListView. -
MainListPanel: displays a master list which includes allBuyer,Supplier, andDelivererIn aListView. -
OrderListPanel: displays information about eachOrderusing anOrderCardin aListView. -
PetListPanel: displays information about eachPetusing aPetCardin aListView.
Note that each person card (BuyerCard, DelivererCard, SupplierCard) can have any number of the corresponding item
cards (OrderCard, PetCard).

By having separate list panels, it will be easier to customise the display of different Person types as well
as Order and Pet if required by future features and ui improvements.
In each BuyerCard as seen in the image below, the buyer’s Name will be shown together with an index and a label
indicating that (s)he is a Buyer.
- The left side of the
BuyerCarddisplays the contact information of theBuyer, includingPhone,Email,Location, andAddress. - The right side of the
BuyerCardis visually enhanced by adding aListViewofOrderCard, which displays the information of eachOrderthat theBuyerhas made. EachOrderis also given an index in the list.

In each SupplierCard, the structure is similar to that of the BuyerCard except the right side of the card.
Instead of a ListView of OrderCard, it has a ListView of PetCard which displays the information of each
Pet that the Supplier sells. Each Pet is also given an index in the list.
By modifying the PersonCard to the three types of cards stated above, divided into a left section which shows contact
details, and a right section which is a ListView, we can keep the information displayed organised and maintain the
height of each card within a reasonable range
(e.g. if the orders are displayed as plain text below the buyer’s contact information, the card will be stretched
vertically, potentially to an extent that the whole window can only show information of one single buyer).
Alternatives considered for display of person list
-
Alternative 1 (current choice): Has only one display window and displays items (
OrderorPet) together with the person.- Pros: Easy to implement and can view all the information immediately after a command is executed.
- Cons: Too cramped, which may lead to information overload.
-
Alternative 2: Has one display window for person and a separate display window for items, as shown below.
- Pros: More organised and visually pleasant.
- Cons: Hard to implement and need one more command such as
display INDEXto display the information of the person or item.
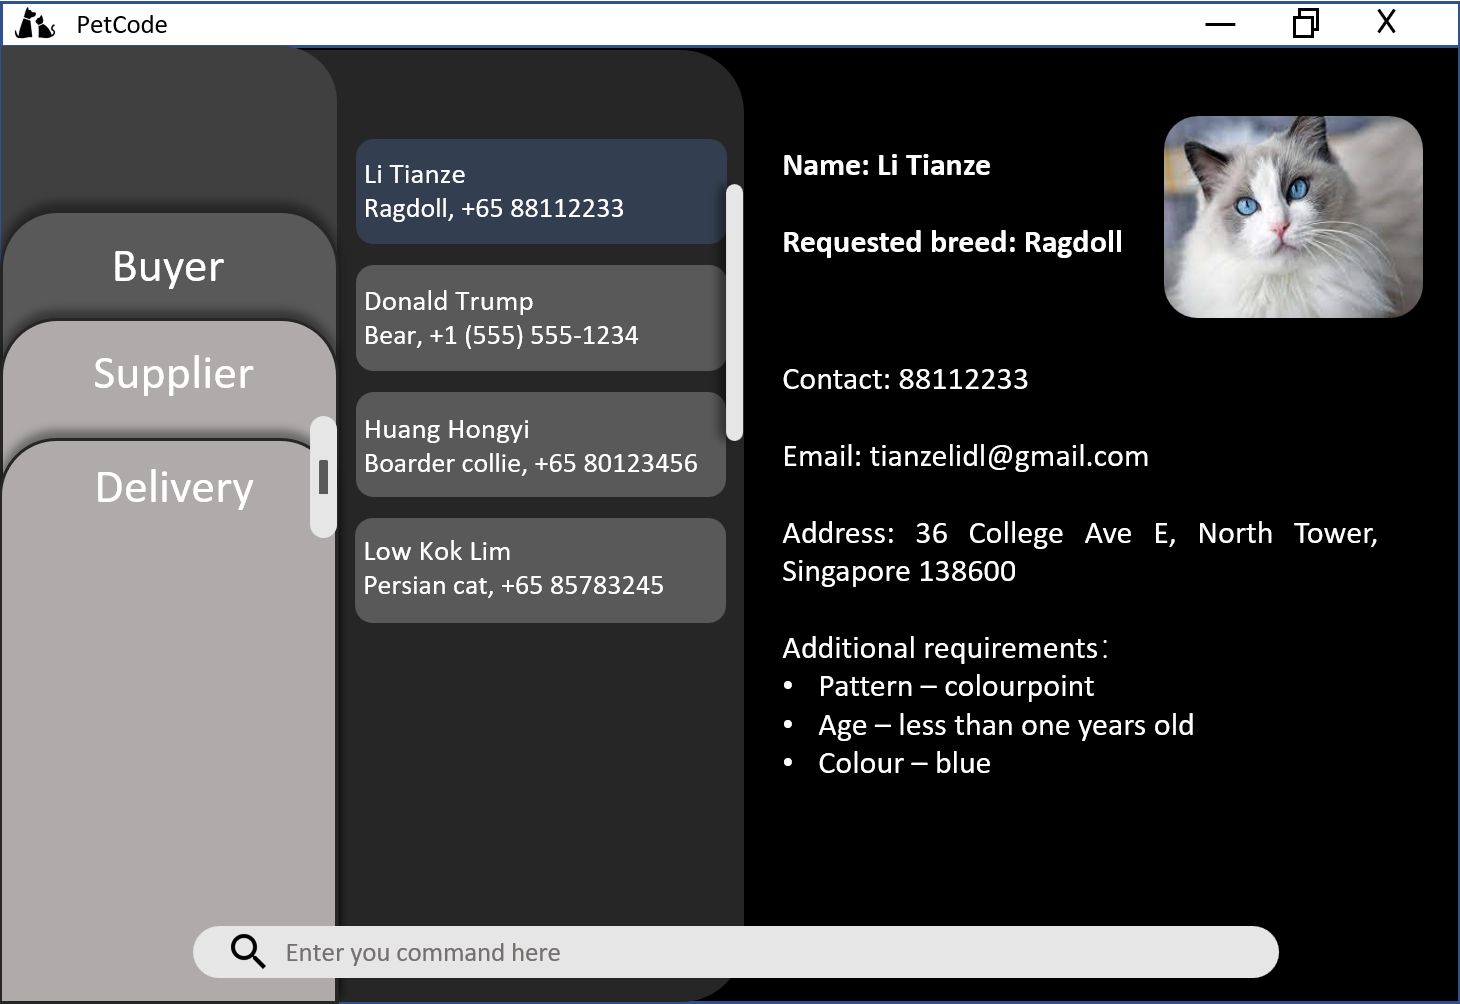
Pop-up window for add command
Motivation for pop-up window
If the user wants to add a Buyer with multiple Order, or add a Supplier with multiple Pet,
the user has to repetitively enter a lot of prefixes.
The user also needs to memorise the prefixes for each attribute of the person or item, and they may get lost when entering such a long command.
Therefore, we recognise the need for a pop-up window for adding a Person (Buyer or Supplier for the current version),
which has text fields that prompt the user to enter the required information without prefixes.
Implementation of pop-up window for add command
Given below is the partial class diagram of Ui component related to AddCommandPopupWindow.
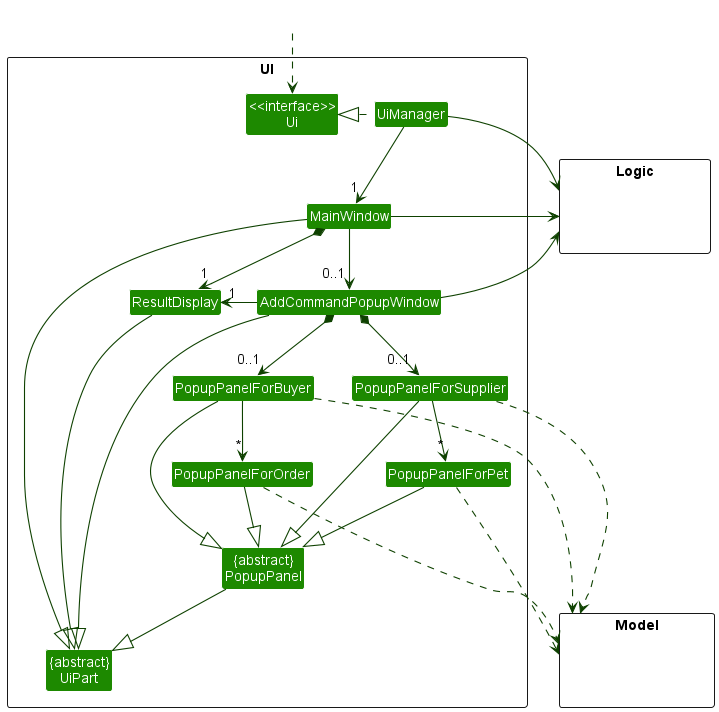
The AddCommandPopupWindow is made up of either PopupPanelForBuyer or PopupPanelForSupplier, depending on the type of Person that the user wants to add.
PopupPanelForBuyer can have any number of PopupPanelForOrder, while PopupPanelForSupplier can have any number of PopupPanelForPet.
All the pop-up panels inherit from an abstract class PopupPanel, which captures the commonalities between classes that represent parts of the content in pop-up window.
Each subclass of PopupPanel can generate a Command based on the attributes specified in some classes of the Model component. Therefore, it has a dependency on the Model component.
The Command is then passed to AddCommandPopupWindow, which keeps a reference to Logic for the execution of the given Command, and a reference to ResultDisplay for the display of CommandResult in the MainWindow.
Given below is the sequence diagram showing how the command line add supplier creates the pop-up window step by step.
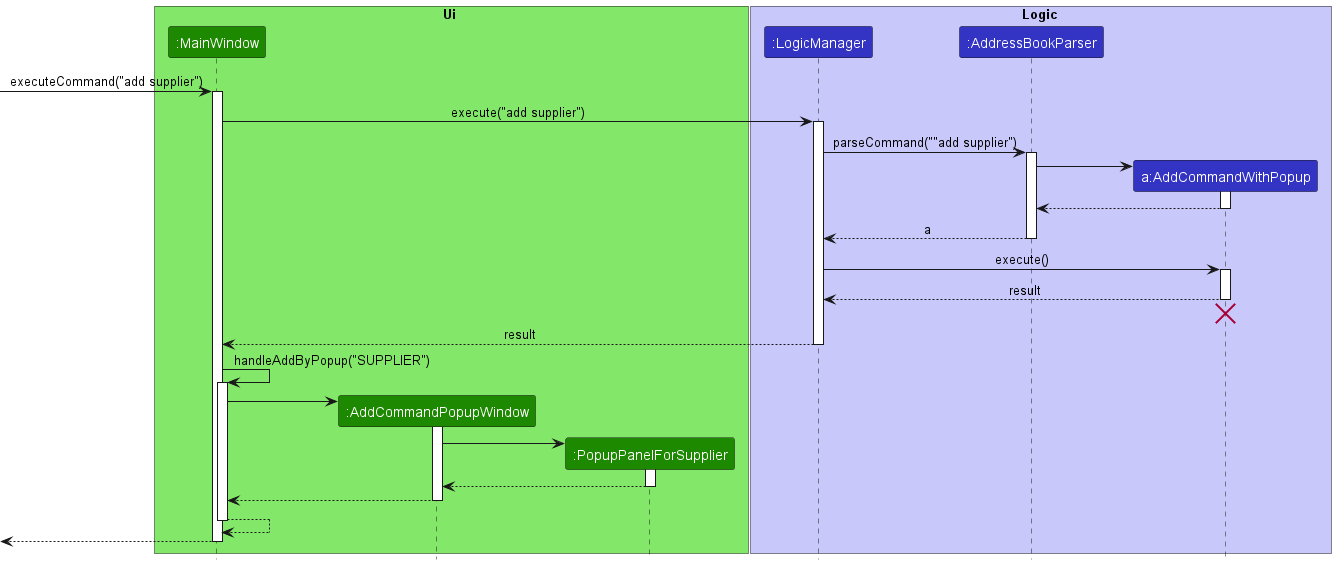
How the pop-window for adding a Supplier is created:
- Based on the graph above, after the user enters the command line “add supplier”,
MainWindowcallsLogicManager#execute(String). - The user input is then parsed by
AddressBookParserand anAddCommandWithPopupinstance is created. -
LogicManagerthen executes theAddCommandWithPopupand returns theCommandResultback to theMainWindow - The
MainWindowrecognises from the result that a pop-up window is required for adding aSupplier, and invokes thehandleAddByPopupmethod in itself. - The
handleAddByPopupmethod then creates aAddCommandPopupWindow, which has aStackPane. TheStackPaneis in turn filled by aPopupPanelForSupplier. - The filled
AddCommandPopupWindowis displayed to the user.
After the pop-up window is created, the user enters information about the Supplier in the provided text fields and saves the inputs. The sequence diagram below illustrates how the pop-up window deals with user inputs on saving step by step.
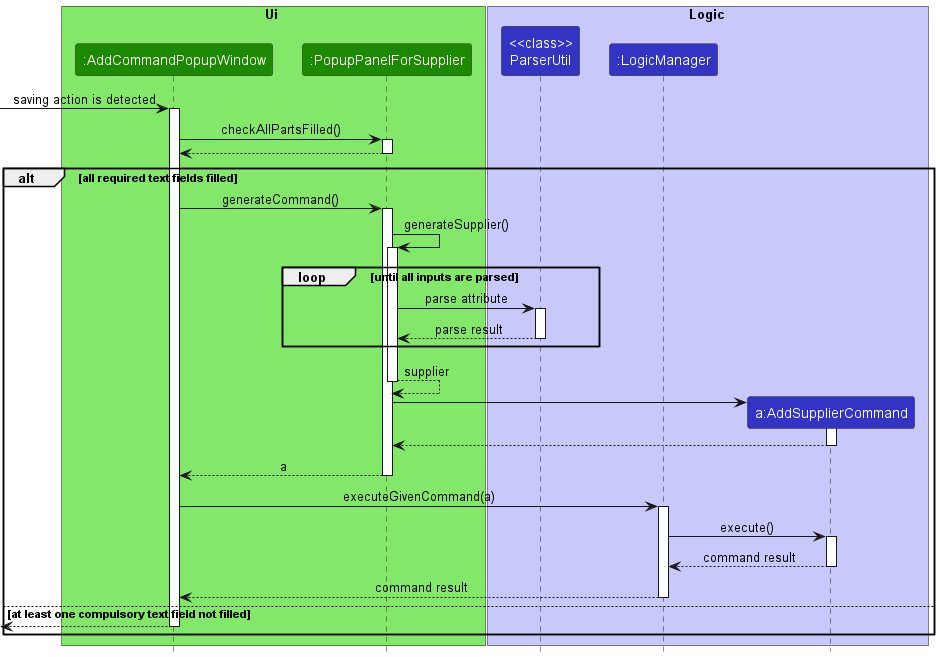
How the user’s input for a Supplier in the pop-window is saved:
- The UI detects there is a saving action (either by pressing the save button or using
CTRL + S). - The
AddCommandPopupWindowcallsPopupPanelForSupplier#checkAllPartsFilled. If there is at least one compulsory text field without any user input, the pop-up window will do nothing. - If all required text fields have user inputs, the
AddCommandPopupWindowtries to generate aCommand, during which thePopupPanelForSuppliergenerates asupplierusing thegenerateSupplier()method in itself. - The generation of a
Supplierinvokes the corresponding static methods in theParserUtilclass for each of the supplier’s attribute, until all inputs are parsed. -
(NOT SHOWN IN DIAGRAM) When there are subcomponents in the
PopupPanelForSupplier(PopupPanelForPetin this context), it also parses the inputs in these subcomponents by callingPopupPanelForPet#generatePet()after thegenerateSuppliercall. - The generated
Supplier(with / withoutPet) is used to create anAddSupplierCommandinstance, which is then returned to theAddCommandPopupWindow. - The
AddCommandPopupWindowexecutes theAddSupplierCommandinstance, and gets back theCommandResult.
The following activity diagram summarises how the UI responds to an add command with the pop-up window.
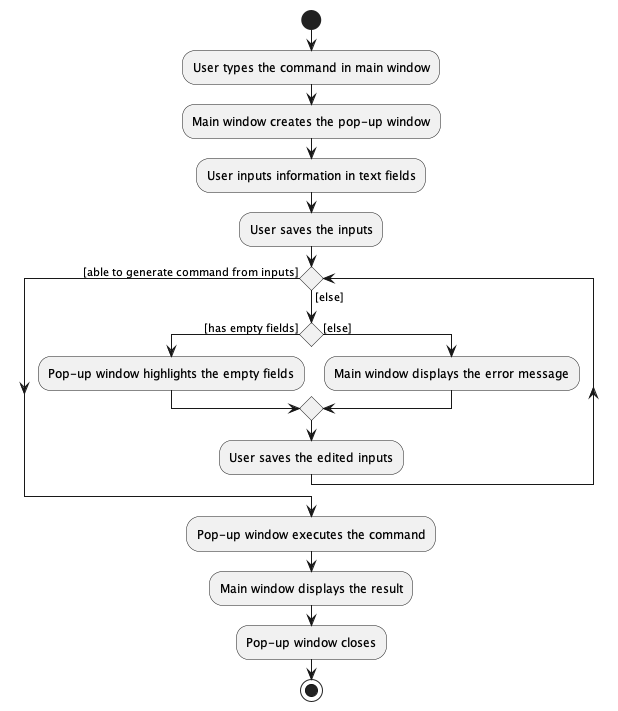
For example, pressing
ESC closes the pop-up window without saving, and pressing CTRL + S saves the user input and closes the pop-up window.
This is achieved using EventHandler, EventFilter and KeyCodeCombination of JavaFX.
Alternatives considered for pop-up window
-
Alternative 1 (current choice): Has a separate pop-up window when a
Commandin the form similar toadd supplieris entered by the user, with multiple text fields that contain prompt text for the user to input.- Pros: Recognition rather than recall, reducing the user’s need to memorise the prefixes required.
- Cons: Hard to implement, less CLI in nature.
-
Alternative 2 (also implemented): Has a
Commandthat can add aPersonwith multipleOrder/Petby prefixes in theCommandBox(single text field, no prompt text) of theMainWndow.- Pros: Easy to implement, more CLI in nature.
- Cons: Tedious when entering the
Command, a lot of memorisation work to remember the prefixes.
Match feature
Motivation for Match feature
Our target user, pet sales coordinators, needs to find out which pet for sale is the best fit for an order placed by
a buyer. In an Order, the buyer can specify attributes such as the age of the pet (s)he wants, the acceptable price interval, and more. We
have intentionally set up the same attributes for a Pet object.
Since there are many attributes the user has to take note of when finding the best fit pet for an order, we have
implemented the Match feature which makes comparisons between the attributes of the Order object and Pet objects to
find the best fit pet.
Implementation of the score system
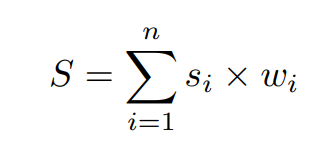
We use a score to determine how close a pet matches an order. As shown below, the total score S is the sum of n
sub-scores.
Every sub-score is the product of an indicator variable s_i and a weight w_i. Every indicator-weight pair
corresponds to an attribute that both Pet and Order have.
The indicator variable depends on the attribute it corresponds to. There are two types of indicators:
-
Must-have indicators: They are 1 if the attribute in
Petis exactly the same as that inOrder, otherwise 0. -
Deviation indicators: They are 1 if the attribute in
Petis within the expected range of value for the same attribute inOrder. How close these indicators are to 1 indicates the deviation the attribute inPethas from the expected value of the attribute inOrder, i.e The larger the deviation from 1, the larger the deviation is from theOrderexpected value.
We use must-have indicators and high weights for must-have attributes. For example, if the species of the pet is exactly what the buyer wants, then the must-have indicator is 1 and the weight given is high. This results in a high sub-score given to the attribute, “pet species”. The rationale behind this is that a buyer certainly prioritises the species of the pet (s)he wants, even if other factors are slightly different from what is expected.
We use deviation indicators and low weights for lower-priority attributes. For example, if the price of a pet just falls in the expected price range of an order, then the deviation indicator is 1. Otherwise, the value of the indicator depends on how far the pet’s price is away from the range.
Sample calculation of the score
| Field | Pet | Requested by Order | Indicator | Weight | Sub-score |
|---|---|---|---|---|---|
| Age | 4 | 5 | 1 - abs(4 - 5) | 30 | 0 * 30 = 0 |
| Color | White | Black | 0 | 100 | 0 * 100 = 0 |
| Color pattern | Dotted | None | 0 | 100 | 0 * 100 = 0 |
| Species | Persian cat | Persian cat | 1 | 500 | 1 * 500 = 500 |
| Price (range) | 50 | 90, 100 | 1 - abs(90 - 50) | 5 | -39 * 5 = -195 |
In the implementation of our Match feature, the attributes Color, ColorPattern and Species are must-have
attributes and thus the indicators for these attributes are must-have indicators. The attributes Age and Price
are lower-priority attributes and thus the indicators for these attributes are deviation indicators.
Based on the table above, the total score for this pet is 0 + 0 + 0 + 500 - 195 = 305.
How the match feature works
With the scoring system, we calculate the score of all pets against an order and sort these pets in descending order of their calculated score. This is sorted list of pets is then displayed to the user in the MainWindow. The pets at the top of the displayed list are likely to be the best fit.
Given below are the sequence diagrams when match 1 is executed.
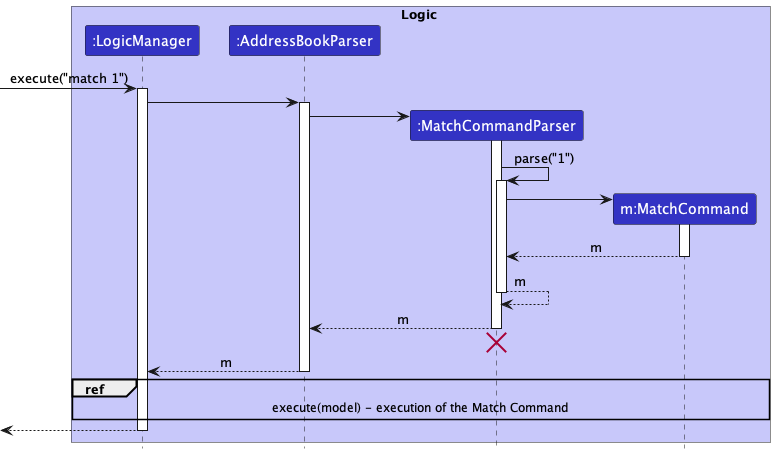
How the MatchCommand is created for match 1:
- When
Logicis called upon to execute thematch 1command, it uses theAddressBookParserclass to parse the user input. - This results in a
MatchCommandParserobject created to parse the parameter supplied by the user, “1”, to create aMatchCommand. - The
MatchCommandcreated is then passed back to theMatchCommandParser. - The
MatchCommandParserthen passes the createdMatchCommandback to theAddressBookParser. - The
AddressBookParserthen passes the createdMatchCommandback toLogicManagerfor execution.
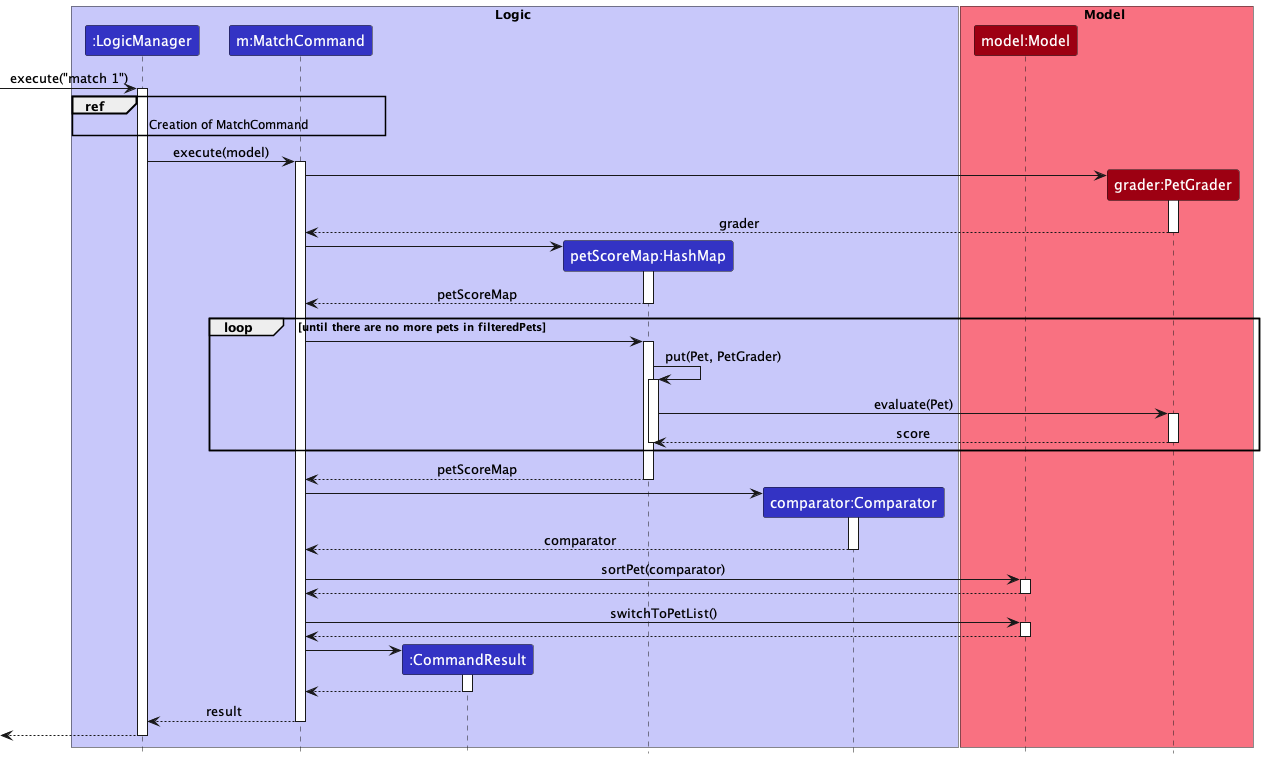
How the MatchCommand is executed for match 1:
-
(NOT SHOWN IN DIAGRAM) The
MatchCommandgets theOrderandPetlists and fromModeland stores the lists as local variables. -
(NOT SHOWN IN DIAGRAM) The
MatchCommandthen uses theOrderlist to retrieve theOrderat the specified index, which is “1” in this context. - A
PetGraderobject is then created to be used for evaluating the scores of eachPetin thePetlist against theOrder. - A
HashMapobject is then created to be used for storing the score for eachPet. - Each
Petin thePetlist is then evaluated by thePetGraderobject and their scores are stored in theHashMapobject. - A
Comparatorobject is created to be used for comparing the scores of thePetobjects. -
(NOT SHOWN IN DIAGRAM) The
Comparatorobject then compares the scores of thePetobjects stored in theHashMapobject and sorts them. - The
MatchCommandcalls on the methodsortPetsin theModelusing theComparatorobject created. This sorts thePetlist inModelaccording to descending order of thePetcalculated scores. - The
MatchCommandthen calls on the methodswitchToPetListinModelto display the sortedPetlist to the user. - A
CommandResultobject is then created in theMatchCommandand passed back to theLogicManager, to display the success message.
Example of how the match command works
To have a deeper understanding of what it does, take a look at the two diagrams below. Take the four pets Shiro, Ashy, Page and Snowy as examples. Plum and Buddy are ignored for simplicity.
We assign a score to each pet according to how many attributes they have are the same as requested, and how much deviation, if they don’t fit, the attributes have from expected values. The higher the score, the more suitable the pet. In this table, Shiro has all requested attributes except its price. However, its price is too far away from the acceptable range fifty to ninety, so a very low score. Ashy does not satisfy any requirement, so another low score. In the next row, some of Page’s attributes fit and the others do not, so an intermediate score. Finally, although Snowy is a little bit old, it satisfies all other requirements. Because the difference between its age and the expected age is not too big, it has a high overall score.

The next thing our app will do is sort the pets by their scores. This sorted list will be displayed on the screen. Now, as a smart pet sale coordinator who wants to maximise utility and profit, you may want to sell Snowy to this customer.

Areas for improvement for Match feature
At this stage, the weights are pre-set and fixed, so the score may not truly reflect how important each attribute is from a buyer’s or a sale coordinator’s perspective. In future implementations, we will allow users to configure these weights, if they don’t want to use the default weights.
[Proposed] Undo/redo feature
Proposed Implementation
The proposed undo/redo mechanism is facilitated by VersionedAddressBook. It extends AddressBook with an undo/redo
history, stored internally as an addressBookStateList and currentStatePointer. Additionally, it implements the
following operations:
-
VersionedAddressBook#commit()— Saves the current address book state in its history. -
VersionedAddressBook#undo()— Restores the previous address book state from its history. -
VersionedAddressBook#redo()— Restores a previously undone address book state from its history.
These operations are exposed in the Model interface as Model#commitAddressBook(), Model#undoAddressBook()
and Model#redoAddressBook() respectively.
Given below is an example usage scenario and how the undo/redo mechanism behaves at each step.
Step 1. The user launches the application for the first time. The VersionedAddressBook will be initialized with the
initial address book state, and the currentStatePointer pointing to that single address book state.

Step 2. The user executes delete-b 5 command to delete the 5th buyer in the address book. The delete command
calls Model#commitAddressBook(), causing the modified state of the address book after the delete-b 5 command executes
to be saved in the addressBookStateList, and the currentStatePointer is shifted to the newly inserted address book
state.

Step 3. The user executes add-b n/David … to add a new person. The add-b command also calls Model#commitAddressBook()
, causing another modified address book state to be saved into the addressBookStateList.

Model#commitAddressBook(), so the address book state will not be saved into the addressBookStateList.
Step 4. The user now decides that adding the person was a mistake, and decides to undo that action by executing
the undo command. The undo command will call Model#undoAddressBook(), which will shift the currentStatePointer
once to the left, pointing it to the previous address book state, and restores the address book to that state.

currentStatePointer is at index 0, pointing to the initial AddressBook state, then there are no previous AddressBook states to restore. The undo command uses Model#canUndoAddressBook() to check if this is the case. If so, it will return an error to the user rather
than attempting to perform the undo.
The following sequence diagram shows how the undo operation works:

UndoCommand should end at the destroy marker (X) but due to a limitation of PlantUML, the lifeline reaches the end of diagram.
The redo command does the opposite — it calls Model#redoAddressBook(), which shifts the currentStatePointer once
to the right, pointing to the previously undone state, and restores the address book to that state.
currentStatePointer is at index addressBookStateList.size() - 1, pointing to the latest address book state, then there are no undone AddressBook states to restore. The redo command uses Model#canRedoAddressBook() to check if this is the case. If so, it will return an error to the user rather than attempting to perform the redo.
Step 5. The user then decides to execute the command list buyer. Commands that do not modify the address book, such
as list buyer, will usually not call Model#commitAddressBook(), Model#undoAddressBook() or Model#redoAddressBook().
Thus, the addressBookStateList remains unchanged.

Step 6. The user executes clear, which calls Model#commitAddressBook(). Since the currentStatePointer is not
pointing at the end of the addressBookStateList, all address book states after the currentStatePointer will be
purged. Reason: It no longer makes sense to redo the add-b n/David … command. This is the behavior that most modern
desktop applications follow.

The following activity diagram summarizes what happens when a user executes a new command:

Design considerations:
Aspect: How undo & redo executes:
-
Alternative 1 (current choice): Saves the entire address book.
- Pros: Easy to implement.
- Cons: May have performance issues in terms of memory usage.
-
Alternative 2: Individual command knows how to undo/redo by
itself.
- Pros: Will use less memory (e.g. for
delete, just save the person being deleted). - Cons: We must ensure that the implementation of each individual command are correct.
- Pros: Will use less memory (e.g. for
{more aspects and alternatives to be added}
Documentation, logging, testing, configuration, dev-ops
Appendix: Requirements
Product scope
Target user profile:
Coordinators of pet sale who need a contact list of both clients, deliverers and suppliers. These coordinators run their business online and get used to typing. Such people need to maintain a contact list of clients, deliverers, and suppliers.
- get used to desktop for their online business, and can type fast
- meet a lot of people online
- need to contact a lot of people on a regular basis
- need to keep track of fast-growing pets
- need to find suppliers for customer demands
- need to find customers for suppliers’ pets
- need to do demand-supply matching
- need to arrange international deliveries
Value proposition:
- It is difficult to coordinate (international) pet sales. Suppliers have pets for sale, and clients may have a rough idea about what pets they want to buy. Once the need and the supply match, deliverers have to carry out the deal. Such need-supply matching and international pet shipment is difficult to manage. Our app will serve as a more convenient tool for pet sale coordinators to manage the whole process. Our app will record the needs of clients, current unsold pets from suppliers, and deliverers’ details. It will automatically match the best-fit pet to a client’s needs.
- Coordinators who run their business online need delivery. Given the location (country) of the client and the supplier, our app will generate a list of deliverers who have a service over the line, based on records.
- Unlike other products, pets need a certificate to be legally sold - including photos of the animals, whether they are pure-bred etc. Our app will also help manage certificates.
User stories
Priorities: High (must have) - * * *, Medium (nice to have) - * *, Low (unlikely to have) - *
| Priority | As a … | I want to … | So that I can… |
|---|---|---|---|
* * * |
pet sale coordinator who has new partnerships | add contacts of buyers, deliverers and suppliers | keep in touch with them whenever needed. |
* * * |
pet sale coordinator who types fast | add contacts of buyers, deliverers and suppliers using CLI | efficiently manage my business. |
* * |
pet sale coordinator who is more familiar with GUI | add contacts of buyers, deliverers and suppliers using GUI | not be confused by CLI commands and prefixes. |
* * * |
pet sale coordinator | be able to delete any contacts of people | remove entries that I no longer need. |
* * |
pet sale coordinator whose clients change their contacts frequently | be able to edit contact information about clients | get their latest number and address for easy contact. |
* * |
pet sale coordinator | be able to find all contacts (buyers, suppliers, deliverers) by attributes (e.g. email) | not waste time searching for a specific contact details. |
* * * |
pet sale coordinator | list a summary of all contacts in storage | have an overview of my network. |
* * |
pet sale coordinator who has business partners from different backgrounds | sort all contacts by attributes (e.g. name) | have a more organised view of my business partners. |
* * * |
pet sale coordinator | add an order to a buyer | keep track of they want to buy and what their requirements are. |
* * * |
organised pet sale coordinator | delete an order from a buyer | free up storage and clean workplace. |
* * * |
pet sale coordinator | list a summary of all orders from the buyers in storage | have an overview of what the buyers want. |
* * |
pet sale coordinator | be able to filter all orders by attributes (e.g. price range) | not waste time searching for a specific order. |
* * |
pet sale coordinator | check which buyer is associated with an order | see the contact detail of the buyer to negotiate. |
* * |
pet sale coordinator with many orders to handle | sort the orders from the buyers based on their urgency (time) | know which order I should deal with first. |
* * * |
pet sale coordinator | add a pet to a supplier | keep track of what they want to sell and their stock situation. |
* * * |
organised pet sale coordinator | delete a pet from a supplier | free up storage and clean workplace. |
* * * |
pet sale coordinator | list a summary of all pets from the suppliers in storage | have an overview of what the suppliers have. |
* * * |
pet sale coordinator | be able to filter all pets by attributes (e.g. color) | not waste time searching for a specific pet. |
* * |
pet sale coordinator | check which supplier is associated with a pet | see the contact detail of the supplier to negotiate. |
* * * |
pet sale coordinator with many pets | find the pet that best matches a specific order | efficiently find the best pet for my client. |
* * * |
pet sale coordinator with many pets available for sale | sort the pets based on relevance (e.g. price) | know which pet is the most relevant to my concern |
* |
beginner user | read guides and seek help | know how to use PetCode |
* |
normal user | quit when I do not need it for now | save my computer resources |
* |
pet sale coordinator with messy records of contacts and items | clear all records | start from the beginning to organise my data |
Use cases
(For all use cases below, the System is the PetCode and the Actor is the User, unless specified otherwise)
Use case: UC01 - Listing contacts / items
MSS
- User specifies which list to show.
- PetCode displays the specified list.
Use case ends.
Extensions
1a. PetCode detects that the list being specified by the User does not exist.
1a1. PetCode notifies User that the list does not exist.
1a2. User specifies new list.
Steps 1a1-1a2 are repeated until the list exists.
Use case resumes from step 2.
Use case ends.
Use case: UC02 - Adding an Order from a Buyer
MSS
- User specifies who the buyer is and keys in the buyer’s order details.
- PetCode saves this order.
- PetCode displays the updated buyer list with the specified buyer having a new order.
Use case ends.
Extensions
1a. PetCode detects that the specified buyer does not exist.
1a1. PetCode notifies the User that the buyer does not exist.
1a2. User specifies new buyer.
Steps 1a1-1a2 are repeated until the buyer exists.
Use case resumes from step 2.
1b. PetCode detects that there are missing / invalid order details.
1b1. PetCode notifies the User that there are missing / invalid order details.
1b2. User specifies keys in new order details.
Steps 1b1-1b2 are repeated until the order details are valid.
Use case resumes from step 2.
Use case: UC03 - Deleting a contact / item
MSS
- User specifies the type of contact / item and the index of the contact / item they want to delete.
- PetCode searches for this contact / item.
- PetCode removes this contact / item from the list.
- PetCode notifies user that contact / item has been deleted from the list and displays updated contact / item list.
Use case ends.
Extensions
2a. PetCode detects that the specified contact / item does not exist.
2a1. PetCode notifies the User that the contact / item does not exist.
2a2. User specifies new contact / item.
Steps 2a1-2a2 are repeated until the contact / item exists.
Use case resumes from step 3.
Use case ends.
Use case: UC04 - Finding a contact based on an attribute
MSS
- User specifies whether (s)he is searching for a Buyer, Supplier or Deliverer, or any kind of contact and the target attribute.
- PetCode searches for all Buyers, Suppliers or Deliverers with that specified target attribute.
- PetCode displays these Buyers, Suppliers, Deliverers or all three.
Use case ends.
Extensions
1a. User inputs an invalid contact type / missing the contact type.
1a1. PetCode notifies the User that the contact type is invalid / missing.
1a2. User specifies new contact type.
Steps 1a1-1a2 are repeated until the contact type is valid.
Use case resumes from step 2.
1b. User inputs an invalid / missing target attribute.
1b1. PetCode notifies the User that the target attribute is invalid / missing.
1b2. User specifies new target attribute.
Steps 1b1-1b2 are repeated until the target attribute is valid.
Use case resumes from step 2.
Use case: UC05 - Sorting contacts / items
MSS
- User specifies the contacts / items list to sort and the attribute(s) to sort by.
- PetCode sorts the specified list in descending order according to the specified attribute(s).
- PetCode displays the sorted list to the User.
Use case ends.
Extensions
1a. PetCode detects that the specified list is invalid.
1a1. PetCode notifies User that the list specified is invalid.
1a2. User specifies new list type.
Steps 1a1-1a2 are repeated until the list type is valid.
Use case resumes from step 2.
1b. PetCode detects that the specified attribute(s) is / are invalid.
1a1. PetCode notifies User that the specified attribute(s) is / are invalid.
1a2. User specifies new attribute(s).
Steps 1a1-1a2 are repeated until the attribute(s) is / are valid.
Use case resumes from step 2.
Use case: UC06 - Filtering items
MSS
- User specifies the type of items list to filter and keys in the target attribute(s) (s)he is searching for in an item.
- PetCode searches for all specified items with target attribute(s), depending on what the user has specified.
- PetCode displays all items that match the target attribute(s).
Use case ends.
Extensions
1a. PetCode detects that the specified list is invalid.
1a1. PetCode notifies User that the list specified is invalid.
1a2. User specifies new list type.
Steps 1a1-1a2 are repeated until the list type is valid.
Use case resumes from step 2.
1b. PetCode detects that the specified attribute(s) is / are invalid.
1a1. PetCode notifies User that the specified attribute(s) is / are invalid.
1a2. User specifies new attribute(s).
Steps 1a1-1a2 are repeated until the attribute(s) is / are valid.
Use case resumes from step 2.
Use case: UC07 - Checking the buyer of an order
MSS
- User specifies the order list and the index of the order to be checked.
- PetCode searches for the order at the specified index.
- PetCode searches for the buyer of that specified order.
- PetCode outputs the buyer of that order.
Use case ends.
Extensions
1a. The index is not a valid index.
1a1. PetCode notifies user that the index is invalid.
1a2. User specifies new index.
Steps 1a1-1a2 are repeated until the index is valid.
Use case resumes from step 2.
Non-Functional Requirements
- Should work on any mainstream OS as long as it has Java
11or above installed. - Should be able to hold up to 1000 persons without a noticeable sluggishness in performance for typical usage.
- A user with above average typing speed for regular English text (i.e. not code, not system admin commands) should be able to accomplish most of the tasks faster using commands than using the mouse.
- The user interface should be intuitive enough for users who are not IT-savvy.
Glossary
- Buyer: A customer of the pet sale coordinator interested in purchasing a pet.
- Deliverer: A person that is able to provide delivery services from the supplier to buyer/client.
- Supplier: A person that has pets on sale.
- Item: An order or a pet.
- Contact / Person: A buyer/client, or a deliverer, or a supplier.
- Mainstream OS: Windows, Linux, Unix, OS-X
Appendix: Instructions for manual testing
Given below are instructions to test the app manually.
Launch and shutdown
-
Initial launch
-
Download the jar file and copy into an empty folder
-
Double-click the jar file.
- Expected: Shows the GUI with a set of sample contacts. The window size may not be optimum.
-
-
Saving window preferences
-
Resize the window to an optimum size. Move the window to a different location. Close the window.
-
Re-launch the app by double-clicking the jar file.
Expected: The most recent window size and location is retained.
-
Deleting a buyer
-
Deleting a buyer while all buyers are being shown
-
Prerequisites: List all buyers using the
list buyercommand. Multiple buyers in the list. -
Test case:
delete-b 1
Expected: First buyer is deleted from the list. Details of the deleted contact shown in the message in the result display box. -
Test case:
delete-b 0
Expected: No person is deleted. Error details shown in the message in the result display box. -
Other incorrect delete commands to try:
delete,delete-b x,...(where x is larger than the list size)
Expected: Similar to previous.
-
Matching a pet to an order
- Matching a pet with the exact same attributes as the order’s requests
- Change the display list to be the buyer list by using
list buyer. - Add a new order by using this command
add-o 1 o_st/Pending o_r/add-r o_a/1 o_sp/Shiba Inu o_c/White o_cp/None o_pr/600, 1000 o_d/2022-10-20. - Change the display list to be the supplier list by using
list supplier. - Add a new pet by using this command
add-p 1 p_n/Kuro p_d/2021-11-10 p_c/White p_cp/None p_h/50 p_w/20 p_s/Shiba Inu p_v/true p_p/700. - Add another pet using this command
add-p 1 p_n/Aki p_d/2021-11-10 p_c/Black p_cp/None p_h/50 p_w/20 p_s/Shiba Inu p_v/true p_p/700. - Use the list command
list orderto view all orders and get the index of the order you have just added, it should be at the bottom of the order list. - Next, use
match INDEX_OF_ORDER, where theINDEX_OF_ORDERis the index of the order you have just added. Expected: The display list should show thatKuroat the top of the pets list andAkiranked belowKuro.
- Change the display list to be the buyer list by using
Saving data
-
Dealing with missing/corrupted data files
- Delete the
addressbook.jsonfile to simulate missing date file. Launch the application.
Expected: A newaddressbook.jsonfile is created with some sample data.
- Delete the
-
Dealing with invalid data in data file
- Open the
addressbok.jsonfile. Change one of the fields to an invalid data, e.g change one of thepersonCategoryfields under thebuyersto beinvalid. Launch the application.
Expected: Application starts up with no sample data.
- Open the
Appendix: Effort
Our group feels that we have put in much more effort than what was required for this project. We faced several difficulties
in maintaining several entity types. Due to the nature of our product, we had to handle five different entities - Buyer,
Supplier, Deliverer, Order and Pet. Each entity also contains several attributes which makes it even more difficult
to manage. Moreover, we had to account for how these entities and their attributes are displayed to the user in the MainWindow of our application.
This led to a lot of issues with the UI as we had to ensure that the logic of each command and the information displayed to the users
are coherent.
Due to the existence of five entities, we also had to extend the commands for each of these entities. For instance, we could no
longer have just one AddPersonCommand but had to extend the add command to be AddBuyerCommand, AddSupplierCommand,
AddDelivererCommand, AddOrderCommand and AddPetCommand. The same goes for several other commands such as the DeleteCommand,
EditCommand, ListCommand etc. On top of the fundamental commands, we have also implemented a few other commands such as the
MatchCommand, SortCommand and FilterCommand to address the needs of our target user.
Furthermore, since we wanted a smooth user experience for our product, we came up with a AddCommandWithPopup feature
where users can add a Buyer and Supplier contact along with their respective Order and Pet using a popup window
instead of the command box. This is to reduce the user’s frustration in handling multiple prefixes when adding these contacts.
However, to make it appeal more to CLI users, we also implemented shortcut keys in this feature so that users can simply
use their keyboard to fill in contact details and item details.
The addition of all these classes demanded a lot of refactoring to the code base of AB3. For instance, we had to update
the Storage component to store all of these entities in a json-readable format. Furthermore, we had to design many testcases
to ensure that our code was working how we wanted it to. All of these refactoring took a lot of time, effort and teamwork to accomplish.
Lastly, we spent a lot of time updating and proofreading the User Guide and Developer Guide to ensure that our users and future developers would understand how our product works. There was a lot of changes made to the User Guide and Developer Guide due to the addition of many new entities and commands.
Overall, as our team is dedicated to making our product address the needs of our users and improving the user experience when using our product, we have spent a lot of time and effort on this project. We have built upon the original AB3 code base by leaps and bounds (as evident by the number of lines of code written by our team ~30 kLoC). We sincerely wish that our users would find our product addresses their needs and that future developers would be interested in contributing to our product.